 DWG
DWG
Toilet Details — Plans, Sections, Counter Detail and Fixture Mounting Heights
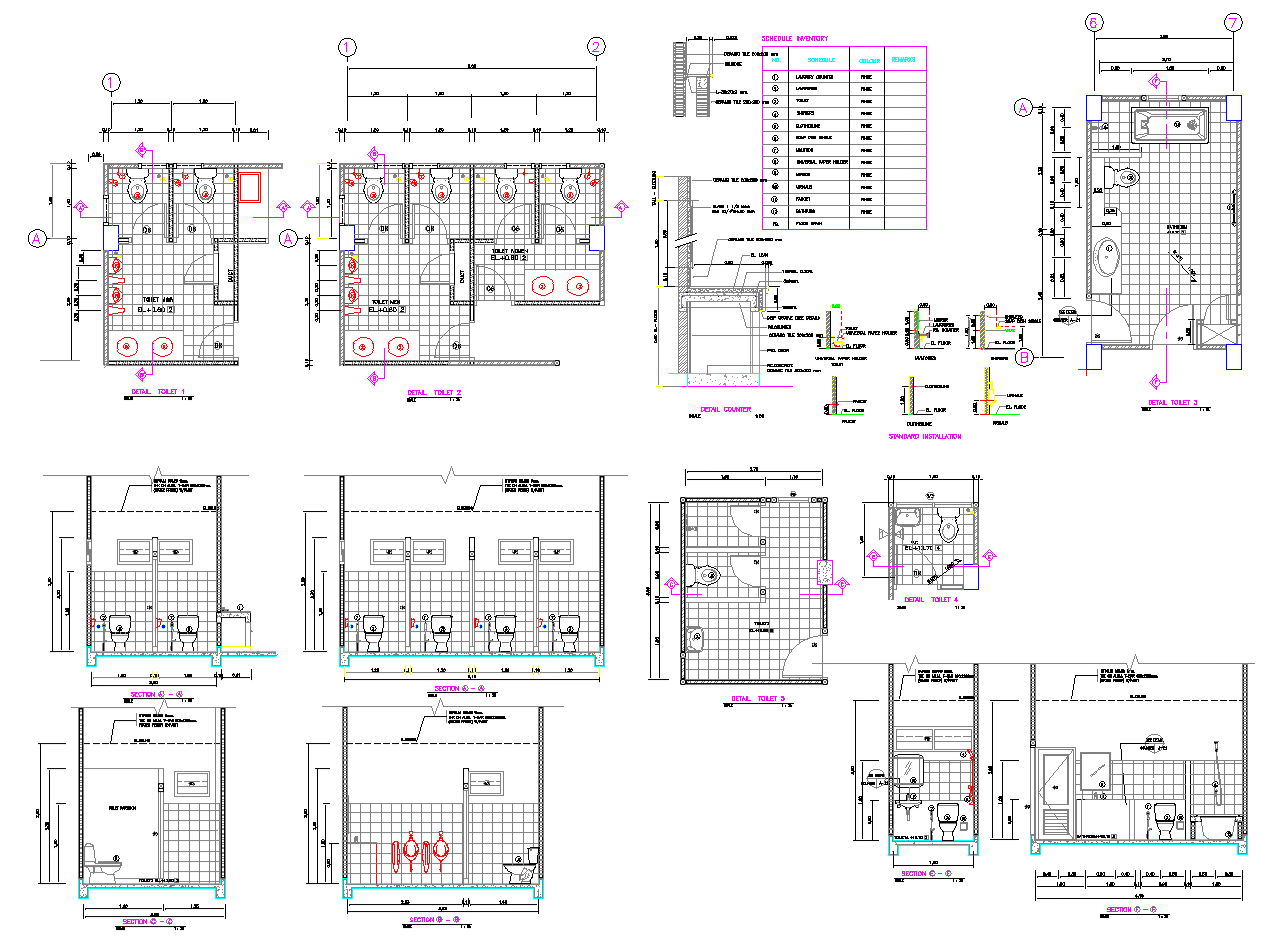
A toilet detail sheet with five room plans and seven sections, covering men's and women's public toilets with WC cubicles and urinals, a bathroom with bathtub, and single WCs. It also includes a vanity counter section, standard installation heights for…
About
What this drawing shows
A single detail sheet for a set of toilets. Five enlarged plans at 1:25 cover a combined men’s and women’s toilet with WC cubicles, urinals and a vanity counter, a separate men’s and women’s toilet block, a bathroom with bathtub, WC, shower and vanity, and two smaller toilets. Each plan is tagged with the floor level, door types and fixture numbers.
Seven sections cut through the plans show the WC cubicles and partitions, the urinal wall, the bathroom and the smaller toilets. They show wall tiling to 1.60 m and a suspended ceiling at 2.80 m, made of 9 mm moisture-resistant gypsum board on an aluminium T-bar grid at 600 × 1200 mm. A counter section at 1:50 shows the reinforced concrete vanity top with its angle support, tiled finish, mirror above and drip groove at the front edge.
A standard installation panel gives the mounting height of each fixture as drawn: WC and paper holder, basin and mirror, shower valve and head, hand-held ablution spray, urinal and clothesline. A schedule numbers every fixture so the tags on plans and sections read against a single list.
Installation notes
Treat the mounting heights on the sheet as the design intent, not a standard. Check them against the project specification and against any accessible toilet requirements before setting out, because accessible WCs and basins have their own heights and clearances that differ from the ones drawn here.
Set out fixtures from the finished wall face, not from the blockwork. With render and 200 mm tiles, the finished face sits well in front of the block, and a WC pan or basin set out from the raw wall ends up out of line with the tile joints. Agree the tile setting-out before the plumber fixes carriers and brackets, so that outlets and valves land on joint lines or tile centres.
The hand-held ablution spray next to each WC needs its own isolating valve and a supply point within reach of the seated user. On site it is often added late and surface-run. Fix its position on the plan early so that the pipework is concealed before tiling.
Floor drains are shown in each cubicle and wet area. Lay the floor screed to fall towards them before tiling. A fall that is too flat leaves water standing at the tile joints, so check the specified fall against the tiling specification, not just the drawing.
The vanity counter is a reinforced concrete slab carried on a steel angle, with the front edge returned and grooved to stop water running back under the top. Waterproof the counter top and the wall behind it before tiling, and seal the joint between counter and wall with silicone, not grout.
The ceiling is moisture-resistant gypsum board on an aluminium grid. Provide access panels below any valves, cleanouts or exhaust fan connections above it, as these are the items most often boxed in and later found to be unreachable.